/
How to add dependencies
How to add dependencies
In Celoxis, there are two ways by which you can add task dependencies within the same project.
1. By manually entering the ID of the predecessor task:
- Go to your project.
- Select the Interactive Gantt view from the View drop down, if its not already selected.
- Select the Columns button from the toolbar and add the Predecessor column to the grid.
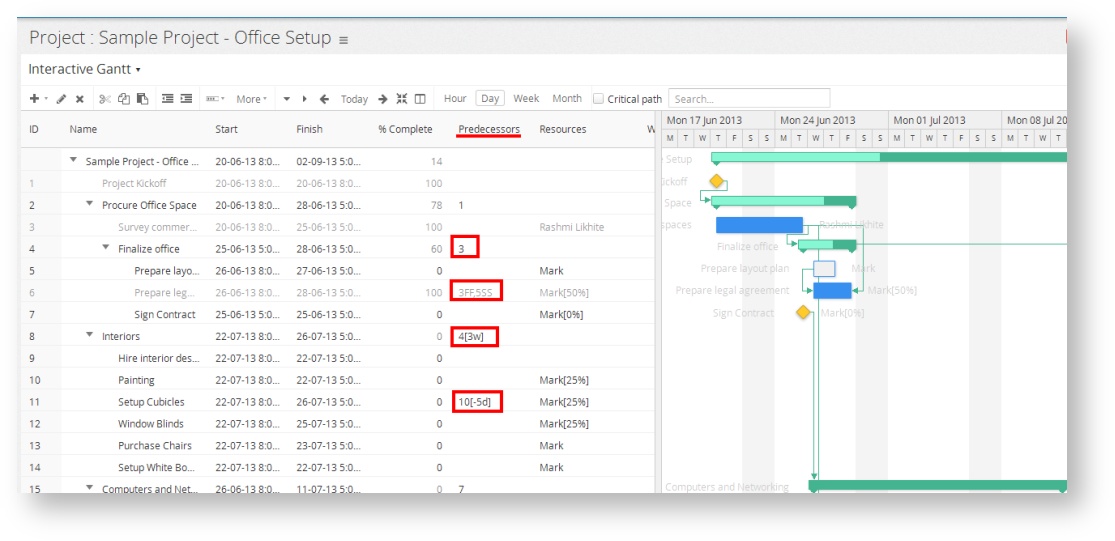
- Select the task for which you need to add a predecessor and type the ID of the predecessor task in its Predecessor cell. The default dependency type is finish-to-start (FS). You can also indicate alternate dependencies (e.g. FF or SS) to model your project realistically.
- You can also indicate lead or lag times using square brackets. For example: 5[-3d] indicates a predecessor (ID 5) with a 3 days lead time. 8[+4h] indicates a predecessor (ID 8) with a 4 hours lag time.
- Task dependencies within the same project are visually depicted using dependency links on the Gantt Chart view.
2. By dragging dependencies from Gantt Chart view:
- Hover over a predecessor task in the Gantt Chart view to bring up small bubble icons at its two ends.
- Move over the bubble at the end of the task. The mouse pointer changes to a hand-pointer.
- Left click on the bubble and drag the dependency link onto the start (left) bubble of a successor task, without releasing the click. You will notice the start (left) bubble of the successor task turns green.
- Now release the click and a finish-to-start (FS) dependency has been added between the two tasks.
- You can enter multiple dependency on a task by separating them by a comma (,). For example 3FF,4SS as seen in the example above.
- The lead/lag time can be set in hours,days, weeks, months, years. For example - 34[-10d] or 3[2w] or 45[5h] or 56[-3w] or 123[4mo] or 23[-1y]
, multiple selections available,
Related content
How to add dependencies
How to add dependencies
More like this
Adding inter-project dependencies
Adding inter-project dependencies
More like this
Adding inter-project dependencies
Adding inter-project dependencies
More like this
Adding inter-project dependencies
Adding inter-project dependencies
More like this
Task Dependencies
Task Dependencies
More like this
Copy tasks from other project
Copy tasks from other project
More like this
